An In-Depth Look Into Food for Hiking: Tips and Ideas
Table of Contents [Show]
Planning Meals for a Multi-day Hiking Trip
While car camping can be a much-needed reset, sometimes we desire to venture further into the wilderness. Backpacking combines hiking with backcountry camping, allowing us to explore a more isolated path using only what we brought on our backs. Our essential hiking checklist considers clothing, shelter, hygiene, and of course, food. Here’s a more in-depth look on what food to take to a multi-day hiking journey.
Because your space will be limited to the size of your backpack, it’s essential you minimize the weight of your food. A lighter load will make for a more pleasant experience while trekking through your destination of choice. We’ve compiled answers to some of the most common questions regarding meal prep for your overnight hiking escape.
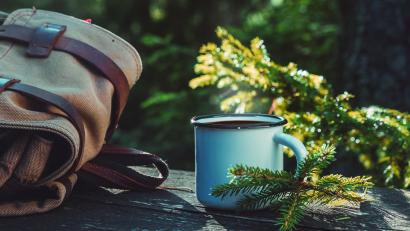
What Food Should I Bring Hiking?
Aim to bring lighter-weight foods and plenty of snacks. While you may be accustomed to warm scrambled eggs in the morning at home, this breakfast is fragile and can create a mess on a multi-day hiking adventure. Your best bet is to keep your meal plan simple as your cooking gear will be limited.
Weigh the pros and cons of the time and energy it will take to make oatmeal and a warm cup of coffee in the morning, as opposed to opting for an apple and granola bar in an effort to hit the trail earlier. Think about all of these factors when creating your grocery checklist.

Food Should Be
- Lightweight
- Simple to make
- Calorie dense (100+ calories per ounce)
- High-protein
Hiking Meal Ideas
Everyone’s list will vary depending on personal preferences, but here are some ideas of items you could bring on a hiking trip. Ensure a satisfying palette by packing a variety of flavors and textures, from salty to sweet and crunchy to crumbly.
Breakfast and Lunch
- Coffee and tea
- Bars
- Cereal
- Breakfast drink mixes
- Nuts and seeds
- Nut butter
- Jelly or honey
- Instant oatmeal
- Bread
- Bagels
- Tuna or chicken in a pouch
- Hard meats, like salami
- Textured vegetable protein
- Pretzels
- Dehydrated fruit
- Pork cracklings
- Fresh products that won’t perish too easily, such as carrots, apples, and oranges
Dinner
- Pre-packaged entrees, such as noodles, rice, or quinoa
- Boxed meals, such as mac and cheese or scalloped potatoes
- Dehydrated, freeze-dried meals

Avoid These Foods
- Heavy foods, such as canned tuna or canned beans
- Soft fruits and veggies that are likely to spoil
- Foods that take up a lot of space, like a loaf of bread
- Foods that lack nutrients, such as ramen
- Meals that require lots of time and effort (you are going to be tired and hungry!)
- Food with excess sugar
Cooking Materials You’ll Need
- Water
- Stove or fuel canister (for heating water)
- Lighter
- Dishes
- Biodegradable soap
- Small towel
- Water treatment method
Dehydrate Your Own Food for Hiking
Dehydrated food is essential for a hiking or backpacking trip that will last more than a couple of days, but it can get expensive. If you have the time and resources, consider dehydrating your own food. To do this, you’ll need to buy a food dehydrator. If it’s your first time dehydrating food, opt for something more basic and upgrade later if you enjoy the process. Different types of food for hiking will require different care, so research and pay attention to your methods of preparation. For more info, take a look at our guide on backpacking meals as well.
Tip: Use a mandolin slicer for consistent, thin cuts of vegetables, fruits, and meats.
How to Dehydrate Fruits and Veggies
- Slice your raw fruits and vegetables thinly and evenly for better consistency.
- Lay slices on dehydrator trays. Do not overlap slices.
- Set your temperature to 135°F.
- Insert tray and leave for two to three hours, and check progress regularly. Dry time will vary depending on moisture levels and slice thickness.
- Halfway through, turn each slice over.
- Once completely dry, remove from trays and place in sealable container or bag.
- Store in a cool, dry place until you’re ready to use them.

How to Dehydrate Meat for Jerky
- Choose a lean cut of meat with no skin, fat, or bones.
- Cut into thin slices, no more than ¼ an inch thick.
- Marinate in seasoning for up to 12 hours.
- Precook the meat by placing in dehydrator until it reaches 165°F to avoid bacterial contamination.
- Dehydrate at 165°F until dry; this usually takes about 5 hours.
- Store in sealable bag, removing as much air as possible.
- Store in a dry, dark place for up to two months.
Tip: You can freeze your dehydrated food to give it a longer shelf life. Just allow the food to defrost inside of the bag after you remove it from the freezer to avoid condensation buildup.
How Much Food to Take Per Day
Bringing too little food will leave you lethargic and distracted, while bringing too much while weight you down. Either way, your athletic performance may suffer. Bring the appropriate amount of food per day for maximum energy levels.
Note: Hunger levels vary based on the difficulty, length, and elevation of the hike, the as well as your height, weight, fitness level, and so on.
Measure Your Food
You can use digital scale to portion your food, or simply use your best judgement with a measuring cup or by counting calories. Most hikers tend to be satisfied with 100-150 grams per meal, or about 2,500 to 4,000 calories per day. This usually equates to about 1.5 to 3 pounds per day.

Test Out Your Hunger Levels at Home
Before embarking on your adventure, choose a less-demanding hike to test out how much you'll need. Ask yourself how much you’ll be hiking per day on your trip, and find a hike with a similar length. Bring your estimated daily amount, and don’t eat anything when you get home. Do you feel nourished, or still hungry? Add or subtract food items based on what our body tells you.
How To Protect Your Food from Wildlife
No matter where you’re headed, there will likely be some form of wildlife there, whether that’s tiny, bothersome mice or large, dangerous bears. Either way, you need to properly store your food away from wild animals. Whenever you go to bed, store your food at least 100 feet away to ensure adequate distance from curious wildlife. Here are the three top methods for your nighttime food storage:
Hang Your Food
The most common way to hang a bear bag is the PCT method. For this method of food storage, you’ll need to be in an area with a decent amount of trees.
How to hang a bear bag:
- Bring a lightweight rope that’s at least 40 feet long.
- Find a branch about 20 feet high.
- Tie a rock to one end of the rope, and tie the other end to an anchor on the ground.
- Toss the rock over the branch.
- Tie a carabiner to the end of the rope and clip on your food bag.
- Pull the bag up as high as possible.
- Tie a clove hitch around a stick high on the rope, within arms reach.
- Lower the bag as the stick rises.
- It will stop when the carabiner and the stick meet midway.
- The bag should be 12 feet off the ground, and about 6 feet beneath the branch.
Bear canisters
Canisters are probably the most reliable way to secure your food. If you are traveling through an area dense with bears, local rules and regulations may require you to bring one. The downside is that they’re quite heavy and limited in space.

Use a bear bag
If the area you are in does not require canisters, you can opt for a lightweight bear bag. These are odor-proof, water-proof bags made up with high-density polyethylene that bears are not able to rip through. The optional purchase of an aluminum liner will also prevent the bear from potentially crushing your food in the bag.
Be Brave, But Be Safe
If you’re heading out on your first multi-day hiking trip, consider starting out with a more attainable length of time, such as one or two nights. Build up your distance or days as you get more practice. Always store your food safely, and always bring enough food for each day of your trip! In addition to your favorite food, you’ll want to pack a complete first aid kit, as well as your best performance gear. Shop our favorite men's and women's hiking pants below.